I am still playing around with trying different ways of felting scarves. I am slowly going through Jill Denton’s book Elegant Scarves… The last scarf I tried to make was inspired from that book, but it didn’t quite work out, and I needed to do some troubleshooting and find a way. Each time I make something that is inspired by a book, I try to do something a little bit different to make it my own so I am not copying exactly. By the way, I do recommend this book as the methods are simple and relatively easy. You can change things up as you like.
 Here is the layout for the scarf. I measured 76 inches long by approximately 9 inches wide. The grid tablecloth is great for this type of thing. You can mark it out as you like with a sharpie. In the book, the colors of the scarf are neutral, but I used bright colors in 19 micron merino that I bought from DHG when they had a sale for Valentine’s day. They were discounting ‘love’ colors across everything, so I took advantage and got the extra fine merino in 500g packs, some viscose in large packs, felt ribbon and some silk fabric. As the 19 micron is the finest merino I have, I thought it would work well for this type of project where the roving is laid out in one long piece. Firstly I laid out one layer of wool in coral, but in 23 micron merino as I was going to lay it out quite fine. I then pulled off 4 lengths of roving fo just over 76 inches and then split them in half and one half I split in two. I then laid them out onto the bottom layer. Once they were all on and even, I cut the ends for a nice straight edge. I still had to play around with the stripes so that they were all nice and straight and not twisted. When I was finished, I spritzed it with the sprayer and left it overnight as I had decided to do this project at the last minute after spending a whole day of grocery shopping and cooking. I get ideas in my head when doing routine work.
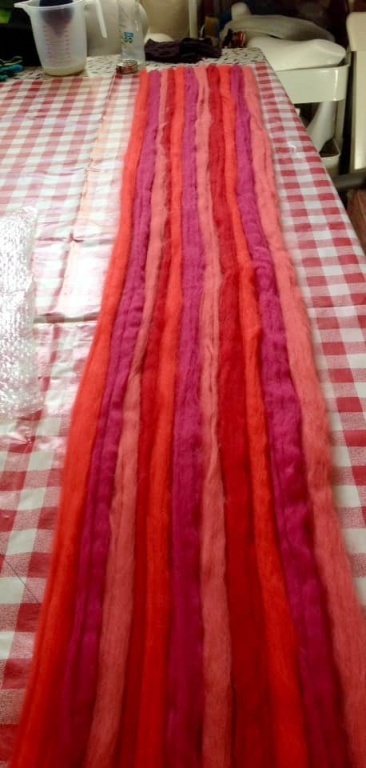
So, the next day I wet out my piece and used the sander. Now, I am not a big fan of laying out roving in long strips as it can take a long time to felt. Usually I am using 23 micron merino as that is what I have and purchased before I knew more about the wool. Since then, I have learned that the finer wool produces better results for wearables, especially nuno felting, even though I like to use 23 mic for hats that need to be stiff. I am almost certain that once I have an influx of cash coming in again when I eventually get back to work that I shall have all the colors in both weights! 🙂 I have also discovered that World of Wool carry natural white merino in 14.5 mic ultra fine. It is more than twice the price for the super fine 18.5 mic for 100g. I might try some in the future to dye and felt with for comparison.
Although I used the sander, the stripy side wasn’t felting as I liked so I turned the piece over. I was thinking that I should have used a darker pink for the base layer as you could clearly see the stripes through it. I am guessing that is because of the light color of the wool and the density of my layout, though I did lay out a fairly decent layer IMO. Also, some of the stripes ended up over the edge of the base and I needed to tidy it up. I could have just added more merino wool to the base in a different color and that would have solved the problem, but I didn’t think of that at the time and decided to add a layer of viscose in the same color with an accent instead. I really like the way viscose feels against the skin and the texture it makes. I did some more sanding and then left it for a couple of hours before coming back to it. It took a bit of handling, but I managed to get the wool and viscose to pass the pinch test.
We then needed to full. This process needed to be done gently as I didn’t want to ruin the viscose side so I did a bit of rubbing on both sides with soap and plastic gloves. I did some rolling too. In fact, I did a lot of rolling, with plastic, with bubble wrap, with pipe insulation, with the bamboo matt and with a combination of everything. I heated it up, threw it around, gently and then decided to leave it overnight and review it in the morning . I had a look at it again and could see that one of my edges was more wavy than the other. I took out my felting tool to full that one side and that worked a treat. I worked on fulling the piece some more and trimmed the sides with scissors and healed the cuts. I only took off tiny amounts to get an even and straight edge. I ended up with a length of 60 inches x just over 8 inches wide. I rinsed, spun and gave it a light pressing.


Here is a close up. The wool felted really well and although you can still see stripes under the viscose side, they are more subdued.


Here is the viscose side. In these photos the scarf has been ironed but still damp. I may take another photo when it is completely dried to see if there is any difference.
Although it took some time and care to felt properly, I am really happy with it. If anything, I learned a lesson in patience and taking my time. The last few projects ended up getting completed in a few days instead of a few hours. I think I will make another one in the 23 mic wool, without viscose, to see what the difference will be. 🙂

It turned out beautifully! Love the stripes.
LikeLiked by 1 person
Thank you!
LikeLike